Ten years ago my husband and I bought a cute little ranch style home that had great bones but needed some updates and TLC. We did so many DIY projects inside and out. I finally decided I needed to share one of them.
With that said, here is one of those projects.
We bought a used hot tub several summers ago and the cover that came with it was old, falling apart and incredibly heavy and awkward. I was searching the web for covers and was put off by how expensive they are. We didn’t have a lot of room in the gazebo we had built for the huge thing either. Then I came across a company in Canada that made a roll up cover with an insulated pad and some beautiful wood beams. I was so impressed I emailed for a quote. Well to say the least, the quote was way more than we wanted to spend too. But that wasn’t going to stop the idea. I searched some more and found a YouTube video posted by a gentleman that made his own cover with a tarp and some 1 x 4’s. That’s when the idea came to me to make my own! I sent the videos to my husband (because he is the build master) and began to plan. Here’s what we came up with:
Update: I have RECEIVED several comments on the supplies I used, to help I have linked the supply list with SIMILAR products so you can get an idea of what I used. Of COARSE they are AFFILIATE links. Thank you for reading our post!
Step 1.
Gather the supply’s:
Boards to sand and stain/paint. Should be long enough to lay over the entire top with an inch or two to hang over. So the boards don’t fall in. We used 1×2 boards.
Stainless steel staples and staple gun
Insulation, found with the house insulation but it is made for coolers. It is thin and flexible.
Duct Tape, (Not shown in the picture but we found it was way more useful than the glue!)
OK, There you have it. You are ready to get started!

Most of the supply’s, but because this was the first time, some other supply’s were used later.
Step 2.
Measure twice cut once! Cut your boards long enough to overlap each side of the hot tub by about an inch. The video I watched by the gentleman on U-Tube said he had trouble with his falling into the hot tub, he recommended they be a little longer.

Cut the wood to size.
Step 3.
Sand your boards smooth and wipe clean. Paint with a waterproof stain or paint. We used Thompson’s simi transparent waterproof stain to try and match our hot tub wood.

Paint with water proof paint/stain.
Step 4
While waiting on the boards to dry you can start working on the tarp. You want a tarp that is several inches bigger than your hot tub dimensions. I cut it twice as long plus 3 inches on each side so I could fold it over. The width was the width of the hot tub plus several inches on each side. The extra inches were to fold over and glue down at the end.

Cut the tarp to have at least 3 inches all the way around to fold over the top of the insulation. Glue down the insulation or use duct tape to hold it down to the tarp. We used glue but it didn’t hold well so you will see in the next few pictures how I had to salvage it with duct tape to hold the insulation to the tarp. I also taped the insulation together so it would be all one piece. Once the glue is dry you will turn it over so the top of the tarp is up.
Step 5
I don’t have a picture of this part but you can kind of see it here. You want to glue the boards down onto the top of the tarp. You want them to be held in place so you can turn it back over and staple through the insulation and the tarp into each board. You will also want to use stainless steal staples so they don’t rust. We placed the board’s one board width apart to give it room to roll up.

Once you staple all the boards, staple at each end and about every 6 to 8 inches, you will fold the tarp over to cover the insulation. I folded all the edges over and glued them down. However, the glue we used did not hold well even after we weighted it down and left it overnight. We found it still needed to be stapled all the way around to hold it tight. I then covered all the staples with brown duct tape to give it a finished look.

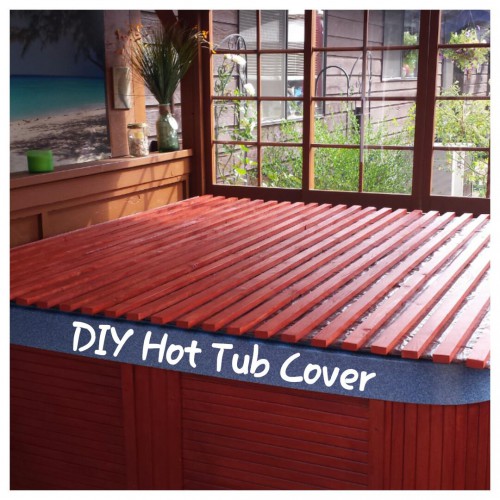
Here is the finished Cover! Nice!


The blue cover you see in the picture here is a pool blanket we found Here. We chose to take it off once we had the cover finished, just didn’t need it anymore.
Update 3/10/2016
We have been using our cover now for 6 months and it is holding up Great!
Update 5/18/16
The Cover is Great! Still love it!
DISCLOSURE: SOME OF THE LINKS IN THIS POST ARE AFFILIATE LINKS AND IF YOU GO THROUGH THEM TO MAKE A PURCHASE I WILL EARN A COMMISSION. WHETHER OR NOT YOU DECIDE TO BUY SOMETHING IS COMPLETELY UP TO YOU.


How is the cover working? I need to replace a cover on an outdoor spa. I really like how this looks.
LikeLike
Hello Ashley,
Thanks for your question! I have been thinking of posting an update on the cover. It has been on for several months now and it is working GREAT! We love it. It’s so easy to roll up and back. It is not heavy and does not take up much space, which is what we needed in our small gazebo. We have ours inside a gazebo so it has not been exposed to wind or rain but I think if it had, it would do just fine. The only issue we have had with it so far, is because of the way I folded the tarp and sealed the edges. When we roll it up we get air inside towards the end of the roll that we have to press out slowly as we roll it back. I think I could remedy that with a small slit or opening at the end we roll it to. I have not done it yet, but I think that would work. When we made it I sealed it fairly good to keep moister out, not thinking about the air inside. I will update when I get it done. Thanks for your comment!
LikeLike
How did the cover hold up a couple years later?
LikeLike
Hello Cassandra, We have since sold our home but when we left it was holding up very well. Thank you for your comment!
LikeLike
How much cm is the distance between the wood.
Grtz
LikeLike
Rubens, they were one boards width apart.
Good luck!
LikeLike
Do u use a regular tarp
LikeLike
Hey Tommy, yep we just used a regular tarp you buy at Home Depot. It is still holding up great! Buy using a tarp twice as long as what we needed and folding it over, it tends to hold a little air when you get to the end of the roll. If you take it slow when rolling it back, the air is pushed out and it does just fine!Thanks for your question!
LikeLike
Where do you buy the foam for the cover.
LikeLike
Hey Tommy,
Thanks for your question! You can get it at Home Depot in the insulation Isle!
LikeLike
I just moved into a house with an outdoor hot tub with no cover. Was looking for some DIY idea to make a cover and I think I have found it. Going to have to give this a try. Thanks for sharing.
LikeLike
Can you let me know how it worked out and where do you live as i live in Montreal so i would like to know if this cover will stand up to our weather.
LikeLike
Sure Tommy, I am in Oregon and I have the hot tub inside a gazebo so it is not out in the direct weather. We did decide it needed another coat of Thompson’s water seal this year but other than that it is holding up great! I don’t know how well it would hold up outside in the direct weather. I would be afraid of snow and the extra weight placed on it causing it to possibly bow in the center. If you do decide to build, please post pictures and let us know how it is holding up! Good Luck!
LikeLike
WOW!! THANK YOU!! I want to make one of these and you made it so easy to follow. I will post a pic when mine is done. SO appreciate you sharing this. Happy Soaking! 😀 Kathleen
LikeLike
Thank you Kathleen!
It has been fun to see all the visits to my post and I really hope it inspires others. We have loved it and I would love to see pictures if you build one! 🙂
LikeLike
I have had over 40 stomach surgerys and our cover even with a lift is still to heavy for me to lift! This is a great idea we are going to try it:) Thank you for idea and instructions!!!
LikeLike
This is such a great idea! I’m planning on making this cover in a few weeks. I live in sunny AZ and my hot tub is similar to yours but outside. I am thinking of using composite wood boards instead of real wood as the sun really does a number on wood here. My question is about the tarp and insulation. Is the insulation sandwiched between 2 tarps? In the finished photo I don’t see any insulation on the top or the bottom of the cover. Or is the insulation just exposed to the water?
LikeLike
Thanks Michele,
Yes, the insulation is in between the tarp layers. I used one long tarp, twice the length needed, then all I had to do was fold it over. The only issue we have had is with air pockets inside as you roll it back. But if you roll it slow you can push it out as you go. It has held up wonderful and is so easy to use. Please let me know how it works out for you and post some pic’s! Good Luck!
LikeLike
Thanks so much for your tutorial! It was hard work for me, i just dont get up as down as easy as i used to! But , so far, i love it, So much better than the really heavy cover! Ours is inside, it was here when we moved in, so weather wont be an issue.Thanks again!
LikeLike
Wonderful Irene! So glad you like it! Thanks for sharing!!
LikeLike
I am excited to make this. Thanks so much for posting!
LikeLike
Great tutorial. I have a few questions. My hot tub is actually in our house – in the walk out basement – and I worry about too much moisture escaping for in the house. Do you feel like it forms a good enough seal to limit that? Also I notice you have something on top of your water too that looks like a solar pool cover. What is that and does it help with insulation/moisture too? Thanks in advance for your help.
LikeLike
Hello Michele,
Great questions, the blue cover over the water is a pool blanket. It does not help with evaporation. We tryed it for a summer and had to add water often. In the picture I had not yet taken it off. I dont recommend it for a hot tub because of that and it also did not keep debris out if you have it outside. As for the seal, with this cover we never had to add water, and unless we had the cover rolled back our windows never steamed up and debris was never an issue. I would say it sealed great. Hope this helps and good luck with your cover!
LikeLike
Looks great, what size boards did you use?
LikeLike
Thanks! We used 1X2 boards
LikeLike
I just wanted to take a moment to tell you how much your post means to me. It is so thoroughly done and well illustrated that I feel confident that I can take on this project! This is significant to me personally because I am living with Muscular Dystrophy, which impacts strength in my hands, arms, feet, and legs, as well as overall balance. Like you, we recently moved into a house with an existing spa (outdoor, no gazebo), but the traditional cover has kept me from using the spa and the automatic lifters on the market were outside my budget, and still required assistance. Hydrotherapy is considered one of the best treatments for MD, so your blog post will have far-reaching effects for me.
I would so appreciate any follow up posts about your project, including things you wish you’d done, etc. I would also be interested in learning more about the blue bubble wrap-like product that seems to lay against the surface of your spa’s water. Is that necessary to facilitate heat retention? I’m not familiar with that product.
LikeLike
Thank you so much Michele for the kind words! I am so glad you feel like you can accomplish this yourself because of our post. It was truly a pretty easy project and I love our cover. You are also correct, I need to post some follow up on our project, but first I will answer your questions. The blue cover you see is what’s called a pool cover. You can get them on Amazon and they can be cut to size. They usually use them for pools. It was very easy to use but I would not recommend it. I found that it did not keep out the debris very well even with ours inside a gazebo. I also noticed that we had a lot of water evaporation and we had to add water to the spa more often. I finally just took it out. The cover we made worked much better. We had almost no evaporation (no more than any other cover), and no more debris in the water. As for the heat retention, I feel like our cover did very well with that. You might be able to add another layer of the insulation but that might make it more bulky and difficult to roll back.
Thank you again for your comments. I am going to post a follow up post with more information about how it has held up. Take care Michele and good luck, come back and update your progress!
LikeLike
I just finished this today! I used a modified version or your idea. My 1×2’s are four inches apart. I did this so I would have a smaller rolled up cover, looks like it is going to work just fine. I used a grey tarp and the rolled insulation that you suggested. I did not stain the 1×2’s, I might paint them later OR use another tarp to cover the whole thing. Thanks for this great idea! I live in Florida and my spa is on the back screened in lanai so there is no problem with cold weather. When I finished the top, I turned on the heat and it stayed perfectly heated! Thank you for posting this great idea!
LikeLike
Thank you Nancy! I am so glad to hear my idea is helping others! Enjoy!!
LikeLike
Live in AZ and I’m actually going to make this for a livestock waterer I purchased to take ice baths in. Wondering if this design holds in heat and cold, or helps to heat the tub? I’m hoping to keep heat out.
LikeLike
Hey Jeff, we used the bubble insulation that is foil sided on both sides so I would think it would help. Foil reflects the heat so I would think it would help. (But I am no expert) Good luck!
LikeLike
Thank you sir! I just finished my lid. i used the same insulation with a tarp over it and the wooden slats. I may have to think about going a little further with insulating the metal container…120 and no clouds is not doing me any favors 🙂 It took nearly 200 lbs of ice and about 100 gallons of water, but I was able to get the water down to 35 degrees for a few hours. Truly appreciate you posting this….so simple, but I would likely have not thought about doing this had I not found this post.
LikeLike
That is great! Thank you for sharing what you did! I am so glad our idea is helping others!
LikeLiked by 2 people
I am planning this diy next week. Was wondering if the tarp is absolutely necessary or could I just staple into the insulation alone?
LikeLike
Hey Debbie, I think I would use the tarp because the insulation isn’t as waterproof alone. That’s just my opinion. Good luck!
LikeLike
Hi again!
We attempted this on the weekend but our wood didn’t stick to the tarp. We did manage to staple the middle planks it but are going to try again. What glue did you use?
LikeLike
Hey,
Sorry to hear that. We had a bit of trouble too. Any brand is fine just make sure it is waterproof and will stick to plastic and wood. Also use stainless steel staples to help hold them together. Good Luck!
LikeLiked by 1 person
I agree with TJ…I would use the tarp. Mine was only 99 cents from the 99 cent store, but I was also covering a smaller area. I’ll have to treat my tarp with a plastic protector because I am in AZ and a normal tarp lasts about 1 summer. I also used stainless screws instead of staples.
LikeLike
Hi. Can you kindly tell me what plastic protector you used and how it worked out? We live in Vegas and would like to try this. Thanks!
LikeLike
We just used a tarp to make the cover. We did use a pool blanket before we made the cover, but it didn’t really help much, the water evaporated and debris got into the water. The cover did so much better! Thanks for your question!
LikeLike
So what was the total cost of the new cover when everything was done? I know prices will very if anything is on sale or depending on the location where it is made. Just around about price would be nice.
LikeLike
Hey Bob! I added up the cost to be somewhere around $150. It just depends on the size you make it and how many boards you use. Hope that helps and thanks for your question!
LikeLike
How well does this hold he heat?
LikeLike
Krystie,
It held the heat very well. Ours was enclosed in a gazebo also. Thanks for your question!
LikeLike
My hot tub is 8 x 8 and it gets very very cold where I live so I am wondering how this will hold the heat in, looks like there could be gaps all around the cover. In the video of the Canadian company it dosnt look like they are using a tarp.
Thanks for posting all of you! I will still try to make this.
Lisa.
LikeLike
Thanks for your comment Lisa, good luck!
LikeLike
Love your design. I too got a quote from the Canadian company and thought it was ridiculously high. I had a quick question for you. What size boards did you use? Are they 2 x 3 boards? Thanks in advance.
LikeLike
Thank you Rodney!
We used 1×2 boards and spaced them one board width apart. Good luck!
LikeLike
Thanks for posting – this is a great idea. I am in Oregon too but my hot tub is outside (not covered). Would rain water just collect in between the slats – not sure how it would drain away since the cover lies flat.
LikeLike
Hey Sam, thanks for your comment. Yea, I would be concerned of the water pooling on top of it too. We always had it under a canopy or in the gazebo. Good luck!
LikeLike
Does it do a good job in holding the heat in?? We have a swim spa & are looking to replace our bulky cover, but want something that will hold the heat the same as the bulky cover.
LikeLike
Hey Carl, it held the heat really well for us. Thanks for the question! Good luck !
LikeLike
Carl- I have a swim spa and my cover is heavy and waterlogged. May I ask what you ended up going with and his well it is holding up? We are in MI, and we gave extremes in weather both ways.
Thanks!
Deb
LikeLike
I found using Marine Vinyl works better than a tarp. It’s sturdier and waterproof and just as flexible. You can purchase it at Jo-Anne Fabrics.
LikeLike
What a great idea! Thank you for sharing that!
LikeLike
Also to aid rolling the cover up, round over the top corners of your boards using either a hand plane or router or cut them at an angle.
LikeLiked by 1 person
I jumped into this, as I was super excited! It cost me about $150 for an 8 x 8 size. In my excitement I accidentally taped the tarp over both sides of the insulation. I really did a thorough job, so the idea of cutting off the duct tape sounds daunting. I’m going to try and screw through the tarp insulation combo into the boards. Hopefully that will work.
LikeLike
Good luck Lisa, let us know how it turns out. The only concern I would have is the moisture on the screws and them rusting, but you might be able to find some that are coated.? Thanks for your post!
LikeLike
I showed your post to a friend of mine who suggested using the material that they use for scuba suits for the tarp. My jacuzzi is situated outside so the wood would probably need maintenance every year because of the hot sun we get in Malta. Still I think it is worth a try, to avoid all the toppings I do all year long because of the wind and sun and also the continued vacuums removing debris. Will update you with my further research and whenever I will do my project. Thanks for the inspiration
LikeLiked by 1 person
Got neoprene cover this week. It is 2.5M by 1.9M an edged all around. Next the carpentry project.
LikeLiked by 1 person
where did you find the neoprene cover at ?
LikeLiked by 1 person
Finally got my carpenter to finish project and cover was attached to jacuzzi. Would love to load pictures.
LikeLike
Hey we really want to make one of these but our space is built in and wondered if this would be walkable? How much weight do you think it could support?
LikeLike
Hey Leanne, I don’t think it would hold a person’s weight if you walked on it. It is pretty light and can easily be rolled from one side. Hope that helps, good luck!
LikeLike
I am very interested in trying this. I tried the links for the pictures you had posted, but the links are dead.
Any chance you could re-post them, or send them to me?
Thanks
MJ
LikeLike
Hey MJ, I don’t have any links with the pictures, all the instructions are on the website with the pictures. Good luck and thanks for the comments!
LikeLike
TJ, My mistake, my internet filter was blocking the pictures.
I hope mine looks as good as yours does.
LikeLike
Seeing ours is outside with a bit of a roof over . but does it keep your water hot? It’s not as thick as the lids you buy. I’m on ontario Canada.
LikeLike
Yes, ours is enclosed, so I can’t guarantee if it is outside it will hold the heat. Ours had no problem holding the heat inside our gazabo. Thank you for the comment!
LikeLike
👏👏👏👏 estoy encantado con esta solución, voy a intentar hacerlo. Muchas gracias desde Cataluña España
LikeLike
I just did this. I love it!!! I did a before temperature reading of ambient air with old styrofoam tub cover and then after with new cover. Took hr long measurements. When I opened the new cover, steam just poured out whereas it wasn’t like this before with old cover.
I did use a high mil tarp and my insulation was an r19.
Looks so much better, easier to be put of way.
I will be installing 2 L brackets on end of tub so the cover has a place to sit when rolled all the way back.
Great writeup!
LikeLike
That is GREAT! Thank you so much for sharing!
LikeLike
Awesome! Thank you for sharing!
LikeLike
Got neoprene cover from a scuba diving suit manufacturer.
LikeLike
Great idea, unfortunately will not work in Arizona…Heat/UV eats tarps up! Need to find a more UV resistant material.
LikeLike
Try neoprene. It worked well here in Malta. Temperatures are not so high as Arizona but we do get hot sunny summers.
LikeLike
How is the cover holding up years later? I really like the look of it. Anything different you would have done? How is it in heavy rains and cold weather?
LikeLike
Hello Diana, Thanks for the question, we sold our home and moved out of state a few years ago so I am not sure how well it is holding up. It was inside a gazebo so the rain didn’t bother it and it did great in cold weather. The thing I would have changed was the air that got trapped inside when you rolled it back, maybe some small airholes would have helped.
LikeLike
Wow what a great idea! Thanks so much for the inspiration. I’m thinking of giving it a try!
LikeLike
We just made ours following your guide 🙂
We tried gorilla glue (for caulk guns) but it also wouldn’t hold the wood to the tarp. My recommendation to anyone else building this would be to skip the glue completely.
https://m.facebook.com/story.php?story_fbid=10101284728676013&id=78201432
LikeLike
Thanks so much for sharing these plans. We made a much smaller version to cover our bathtub cold plunge and it works awesome. Much appreciated.
LikeLike
I realize your comment is over four years old, but just in case you’re still getting notifications —
What did you use to get R19 insulation? That’s better than the traditional foam covers. We live in New Hampshire, it’s an outside tub, and we use the tub year-round (I actually like it better when it’s cold :-). But electricity is pretty expensive around here, so I need to keep the heat in.
LikeLike